After Covid -19 the whole world scare and grapple . People are getting concerned about their health. While practicing good hygiene is a first priority. Yoga has been used for centuries to keeps the body functioning fit and fine, holistically.
If Yoga done regularly it reduces stress systematically in the body which in turn cuts down inflammation regeneration and strengthen the body. Yoga does offer a great deal of wellness and support for your body mind as a whole and boost your immunity.
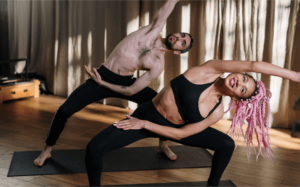
here are five Yogasana poses which you can try to recharge your immunity and cut down your risk of Stress and Anxiety. now first we’ll go for
PARIVARTRIKONASANA – Steps of Asana :-
STEP 1: both legs apart, one meter distance between both legs.
STEP 2 :right ankle at the right side
STEP 3: left hand up, now slowly inhale stretch your left hand up and exhale place your left palm down, close to your right feet.
STEP 4: right hand up towards the ceiling.
STEP 5: look at your right hand fingers, hold the position for 40 seconds.
STEP 6: with inhale slowly come up and Relax now same practice form other side.
So this is PARIVARTRIKONASANA
Now we’ll go for our second Asana
VEERBHADRASANA -1 – Steps of the Asana :-
STEP 1: both legs apart one meter distance
STEP 2: right feet at the right side and left feet also turn in
STEP 3: now turn your upper body to the right side
STEP 4: both hands up, bend your right knee
STEP 5: bend your whole upper body back as much as and lower body push forward hold for 40 seconds then slowly come up with inhale and relax, same practice from other side.
So this is VEERBHADRASANA -1
now gently lay down on the stomach in MAKRASANA legs apart heels facing each other head resting on your Palm.
Now we’ll go for our third Asana
BHUJANGASANA – Steps of the Asanas :-
1.Step 1: Lie down on your stomach and rest your forehead on the ground. Keep your toes together and the soles of your feet facing upward.
Step 2: Place your palms on the ground, just below your shoulders. Your elbows need to be tucked closer to your body and must be parallel to your torso.
Step 3: From this position, inhale deeply, gently press your palms into the ground and lift your upper body off the ground. Your head, chest and abdomen should be lifted, while the rest of your body should continue to be in contact with the ground.
Step 4: Hold your body in this position for a while and take a few deep breaths. All the while, ensure that you are supporting your upper body on the palms of your hands, with equal pressure on both sides.
Step 5: Exhale and lower your abdomen, chest and head back to the ground. now gently lay down on the back to SAVASANA
now we’ll go for
SETU BANDHASANA Bridge posture – Steps of the Asana :-
Step 1: Lie down on your stomach and rest your forehead on the ground. Keep your toes together and the soles of your feet facing upward.
Step 2: Place your palms on the ground, just below your shoulders. Your elbows need to be tucked closer to your body and must be parallel to your torso.
Step 3: From this position, inhale deeply, gently press your palms into the ground and lift your upper body off the ground. Your head, chest and abdomen should be lifted, while the rest of your body should continue to be in contact with the ground.
Step 4: Hold your body in this position for a while and take a few deep breaths. All the while, ensure that you are supporting your upper body on the palms of your hands, with equal pressure on both sides.
Step 5: Exhale and lower your abdomen, chest and head back to the ground.
next we’ll go for
SARVANGASANA the queen posture – Steps of the Asana :-
STEP 1: Lie down flat on your back. Keep your legs close together and your chin tucked in.
STEP2: Breathe deeply. Inhale. Lift your legs upwards till your feet are pointing directly up – that is, till your legs are perpendicular to your torso.
STEP 3 :Tuck your hands underneath yourself with your palms facing up. With your hands under your buttocks, prepare to raise your torso.
STEP 4:Lift your torso gradually till you are resting on your shoulders.
STEP 5 :Your arms must now be bent at the elbow. Bring your hands to your back to support yourself. Your legs should be over your head.
STEP 6 :Slowly straighten your back.
STEP 7: Keep your knees firm but relax your calf muscles now. Maintain the posture.
STEP 8 : To relax, lower your legs till your feet are at an angle of 45 degrees over your head. Lower your arms to the floor. Unwind gradually.
So these are the are the the Asanas.
Some key points which is very important :-
1. listen to your body pain don’t force your body in the posture.
you could pull your muscle and get injured also be careful .
2. keep breathing always in the Posture don’t hold your breath at all until not instructed.
3. your stomach should empty before start Yoga at least three and half hour or four-hour minimum gap should be there after a heavy meal .
Now we’ll move to Pranayama or breathing practices which can help strengthen the lungs clear muscle passive .this exact area it only makes sense to train our lungs and maximum to maximize our breath capacity to help keep them at bay.
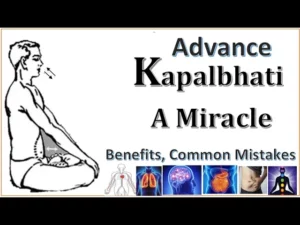
so let’s start Pranayama first, we’ll go for KAPALBHATI PRANAYAM
in KAPALBHATI PRANAYAM active exhalation and passive inhalation. the Kapalbhati Pranayam meaning is Kapal = forehead; bhati = shining
KAPALBHATI (Shatkarm kriya) steps:-
STEP 1: Sit comfortably with your spine erect. Place your hands on the knees with palms open to the sky.
STEP 2: Take a deep breath in.
STEP 3: As you exhale, pull your navel back towards the spine. Do as much as you comfortably can. You may keep your right hand on the stomach to feel the abdominal muscles contract.
STEP 4: As you relax the navel and abdomen, the breath flows into your lungs automatically.
STEP 5: Take 20 such breaths to complete one round of Kapalbhati.
STEP 6: After completing the round, relax with your eyes closed and observe the sensations in your body.
This times of the pandemic need for a stronger immune system and a clear mind to act quickly when needed. Our breath is one of the best remedies we have, to cope with anxiety or panic. It is our breath that has amazing recuperative powers. The breath is intimately connected with our mental and emotional state. Our breath influences our thoughts and emotions . The breath-emotion loop acts very quickly – just a few minutes of deep breathing can calm your mind down.
By conscious breathing, we can activate our body’s innate response to relax. By gradually regularizing our breath, we can help in decreasing the stress hormone, and activating the lymphatic system which plays a critical role in our immune function.
We also engage the parasympathetic nervous system which governs our relaxation and regeneration response, making us more resilient to face challenges.
Kapalbhati Benefits:-
1.Increases the metabolic rate and aids in weight loss.
2.Enhances the capacity of the lungs and makes them stronger.
3.Clears the nadis.
4.Stimulates the abdominal organs and thus is extremely useful to those with diabetes.
5.Improves blood circulation and adds radiance to the face.
6.Improves digestive tract functioning, absorption, and assimilation of nutrients.
7.Results in a taut and trimmed down belly.
8.Energizes the nervous system and rejuvenates brain cells.
9.Calms and uplifts the mind.
so, in the beginning you can go for five rounds to seven round slowly and gradually, you have to increase the rounds after every round fifteen to twenty seconds gap should be there. Very important thing is those who have very high BP, please avoid the KAPALBHATI practices.
so this is all about Kapalbhati Pranayama.
now we,ll start next Pranayam is NAADI SHUDDHI Pranayam or ANULOME VILOME Pranayam .
first ,let me tell you what is Naadis
The Naadis are our energetic irrigation system, they keep us alive. the human body contains 72,000 Naadis that channelise the Prana to every cell.
NAADI SHUDHDHI Pranayam STEPS:-
STEP 1: Begin by taking a full, deep inhalation followed by a slow, gentle exhalation.
STEP 2: Fold the tips of the index and middle fingers inward until they touch the palm at the base of the right thumb (Vishnu mudra). You will alternately use the right thumb to close the right nostril and the right ring and pinky fingers (together) to close the left nostril.
STEP 3: Use the right thumb to close the right nostril. Exhale gently, but fully, through the left nostril. Keeping the right nostril closed, inhale through the left nostril and deep into the belly. As you inhale, allow the breath to travel upward along the left side of the body. Pause briefly at the crown of the head.
STEP 4: Next, use the ring finger of the right hand to gently close the left nostril and simultaneously release the right nostril. Exhale through the right nostril, surrendering the breath down the right side of the body. Pause gently at the bottom of the exhalation.
STEP 5: Keeping the left nostril closed, inhale once again through the right nostril, allowing the breath to travel up the right side of the body.
STEP 6: Then again, use the right thumb to close the right nostril as you release the left nostril. Exhale through the left nostril, surrendering the breath back down the left side of the body. Pause gently at the bottom of the exhalation.
so this is the NADI SHUDDHI PRANAYAMA .
Third PRANAYAM is
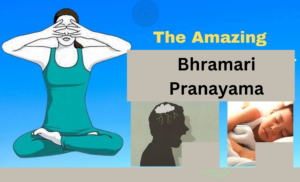
BHRAMARI PRANAYAMA – Steps of the Pranayama:-
STEP1: Sit in a quiet and well ventilated corner and close your eyes.
STEP2: Place your index fingers on your ears right at the cartilage.
STEP3: Breathe in and while breathing out press the cartilage with your fingers. Keep the cartilage pressed while making a loud humming sound like a bee.
STEP4: Breathe in again and out and continue the same pattern for around 6-7 times.
so, this is the BHRAMARI PRANAYAM .
Now the last one is OMKARA CHANTING
OMKARA CHANTING – steps:-
STEP 1: The first step to starting Om meditation is to sit in the VAJRASANA, also known as the Lotus pose. In case you are not able to find a comfortable spot on the floor to do this pose, you can also use a chair to sit. You need to keep your back straight and erect and your hands on either side of your thighs or knees. The point to sitting in the pose is to make sure that you feel comfortable and relaxed. Then sit peacefully and clear your head.
STEP 2: Then slowly close your eyes or glance towards the ground or floor.
STEP 3: The next step involves focusing on the breathing pattern you need to breathe naturally with your mouth closed. Ensure that you inhale and exhale only through your nose. Your jaw muscles need to be relaxed with your lower and upper teeth slightly parted. Remember now to clench your teeth. Focus on inhaling and exhaling without adding any frills to the process.
STEP 4: Once you have your breathing pattern in place, it is time to start aum chanting. You need to fit the Om chant during your breath duration. Elongate the word om by focusing on the first sound and then keep your mouth wide open as you move on to the last part of the om sound by keeping your lips together as you chant. Then stay silent till it is time to repeat the chant.
STEP 5: Continue the aum Chanting while you ensure that you are in sync with your breath. You will soon fall into a cycle of chanting and find your body and mind relaxing gradually.
very important thing in pranayama that your back should be straight your neck should be straight. so, this is the steps of OMKARA CHANTING .
Now the Benefits of OMKARA CHANTING :-
Om chanting meditation will bring you tranquility, serenity, peace, and calmness.
1. If you feel lost, Om meditation will help you come closer to your true self and nature.
2. Om meditation works wonders in making people more open-minded and able to treat others with respect and without any prejudice.
3. It is extremely healing and will keep you healthy and fit.
4. Om meditation will improve your spinal cord strength.
5. Morning meditation with Om chanting will rid your body of all the toxins that have built up.
6. Om meditation improves concentration and the ability to focus.
7. It will improve your heart health.
8. It works wonders in keeping your stress and anxiety levels under control.
so, these are the Pranayama which has tremendous power to increase our lung capacity and positive energy in our body also strengthen our immune system. 20 minutes meditation everyday is enough to keep you away from all kind of stress in meditation. just sit and watch your breath as you notice your mind ripped away from the present with it.
Gently, bring yourself back with compassion and without any judgment or disappointment in your mind. these practices into your current routine you will be able to boost your immune system even more and stay healthy all year long. Yoga is one way you can naturally uplift your vitality without having to step out of the comfort of your home during this lockdown.